Introduction
The journal module allows teachers to collect online text from students, review it and provide feedback and/or grades. Student work is visible only to the teacher and not to the other students.
Journals are available for set amounts of time and can be modified based on feedback. The Journal module is a simple tool that is easy to use but limited in functionality compared to Assignments or Forums. It is probably best suited to frequent, informal, or low-stakes writing or reflections.
Video Overview
Step 1
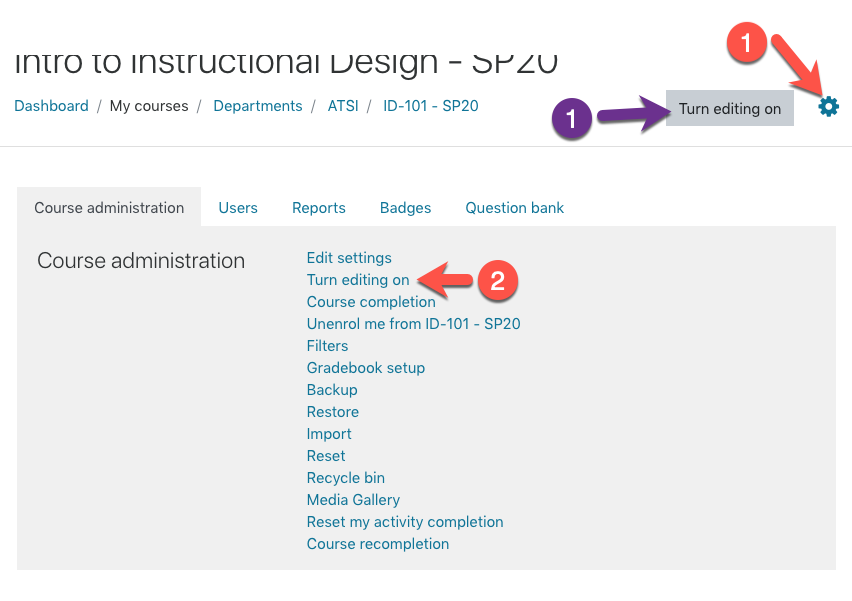
Turn editing on by either:
- Click the gear icon, then choose Turn editing on from the Course administration menu OR
- Alternatively, just click the Turn editing on button.

Step 2
In the section where you’d like to add content, click Add Activity/Resource.

Step 3
Choose “Journal” from the Activity list and click Add.
Step 4
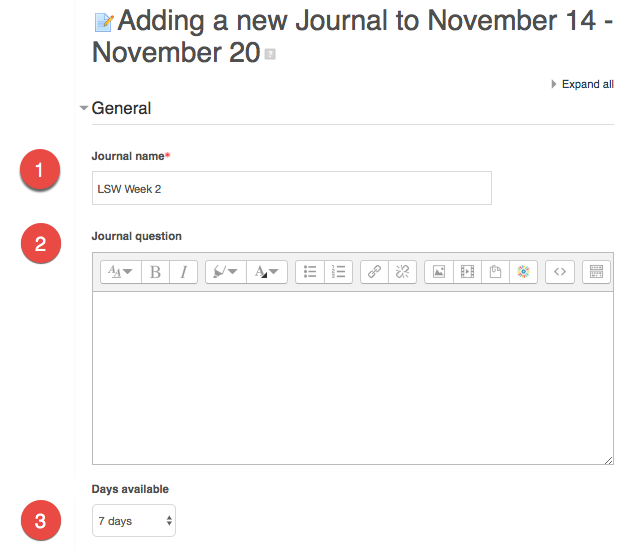
Configure Journal activity settings:
- Give your activity a name.
- Add a question or prompt; this is what your students will be responding to with their writing.
- Configure Days available: This setting will determine the period of time that students are able to add or edit a journal entry. The start date for the journal entry will be the first day the module section. For example, if I add a journal to a Weekly section November 14-20 and leave the default Days available option of 7 days, the Journal will be available to students throughout the entire week. If I set the Days available to 1, it would only be available on Nov 14; if I set to 3 days, it will be available Nov. 14-16, etc…
Note: if you move the Journal to a different section, the availability will change and be begin from the first day of its new section.

If your course is using Topics format instead of weeks, you will not be able to limit the days available.
Step 5
By default, each Journal will be a 100-point graded activity. If necessary, make sure to look at the Grades section and configure the points available to suit your use case. If you want the students work to be ungraded, change the Type setting in grades from “Point” to “None”.
Step 6
Click Save and Display or Save and Return to Course
Viewing Student Work & Giving Feedback
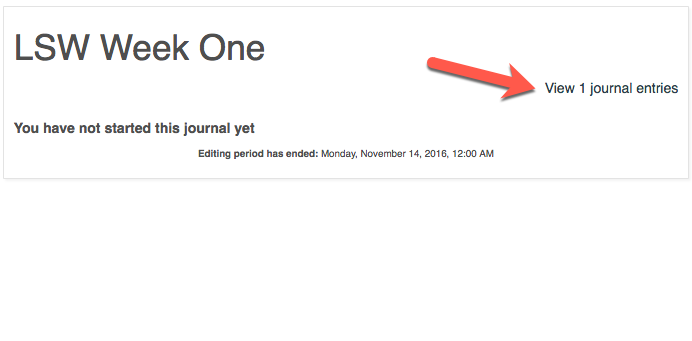
Once your students have added some writing to the Journal, you can read and give feedback or grades. Click into the Journal. You will see a message on-screen that will allow you to View journal entries.

On the view page, you will be able to see all student entries and provide a grade and/or written feedback. This is a simple feedback text-form and does not allow rich text formatting, so you cannot add images, links, video clips, etc (this is a limitation of the Journal activity compared to other tools). Additionally, all submissions are displayed on the same screen – there is no way to view student entries individually. When adding feedback for multiple students, please make sure to click the Save All My Feedback button often to avoid losing work. Students can revise based on feedback as long as the Journal is available.
